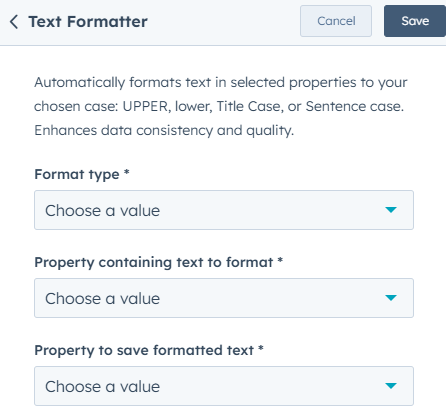
What does the 'Text Formatter' action do?
Allows you to manipulate and format text values in HubSpot records to ensure consistency and proper structure.
The Text Formatter action within the Data Formatter App by Integration Glue allows you to manipulate and format text values in HubSpot records to ensure consistency and proper structure. This action is helpful for adjusting text fields, such as names, addresses, or any other custom text properties, to meet specific formatting requirements.
The action automatically applies a range of text transformations, such as converting text to uppercase, lowercase, or even trimming excess spaces, based on your configuration. This ensures that your CRM data is cleaned up, standardized, and ready for accurate reporting and further automation.
This action is particularly useful when:
- You need to clean up and standardize text data across multiple CRM records.
- You want to automate text transformations for consistent data entry, such as capitalizing first letters or removing unwanted characters.
- You are preparing text fields for exports, integrations, or reporting, ensuring they are formatted correctly.
By automating text formatting in your workflows, the Text Formatter action helps maintain a consistent and organized database, reducing errors and improving the quality of your data.

- Format Type This defines how the text should be formatted. The available options might include actions like:
Uppercase all: Converts all text to uppercase.
Lowercase all: Converts all text to lowercase.
Capitalize first letter of a sentence: Capitalizes the first letter of the first word.
Capitalize first letter of every word: Capitalizes the first letter of every word.
URL encode: Encodes text for safe use in URLs.
URL slug: Converts text into a URL-friendly format (lowercase, spaces to hyphens). - Property Containing Text to Format This is the property where the original text is stored. It’s the source field in which the text resides and which you want to format. The text could be in a standard HubSpot property (like a contact’s name or email) or a custom property.
- Property to Save Formatted Text This is the property where the formatted text will be saved. After the text has been processed (e.g., converted to uppercase, trimmed, etc.), it will be stored in this property. This can either be a new or existing property, depending on where you want to keep the formatted result.
-
Step 1: Create a New Workflow
- In your HubSpot account, go to the Automation tab and select Workflows.
- Click on the Create workflow button.
- Choose the workflow type (e.g., Contact-based, Deal-based, Company-based, or Custom Object-based).
- Set your workflow trigger criteria (e.g., when a deal is closed, a contact reaches a certain lifecycle stage, etc.).
Step 2: Add the 'Text Formatter' Action
- After setting up your triggers, click the + button to add an action.
- In the action sidebar drop-down, scroll down and select Data Formatter App.
- A list of actions will appear. Choose Text Formatter.
- Click Save to add the action to your workflow.
Step 3: Configure the Action
- Format Type: Select the format type you want to apply to the text.
- Options include: Uppercase All, Lowercase All, Capitalize First Letter of a Sentence, Capitalize First Letter of Every Word, URL Encode, and URL Slug.
- Property Containing Text to Format: Choose the HubSpot property containing the text you want to format.
- Property to Save Formatted Text: Select the property where the formatted text will be saved.
Step 4: Review and Activate
- Review all settings to ensure they are correct.
- Save the workflow and check all other actions to make sure they are properly set up.
- Once satisfied with your workflow, click Review and Publish to activate the workflow.
Step 5: Test the Workflow
- Once the workflow is live, trigger it by performing an action (e.g., update a contact's property).
- Verify that the text has been formatted as expected.
Step 6: Use the Formatted Text
- The formatted text can now be used in other workflow actions, reports, or communications.
