What does the 'Resize Image' action do?
Allows you to automatically adjust the dimensions of an image
The "Resize Image" action within the Workflow Media Manager Actions app by Integration Glue allows you to automatically adjust the dimensions of an image. This action is useful for resizing images to fit specific requirements or maintain uniformity in image display across HubSpot records, forms, or marketing assets.
The action resizes the image based on a specified width and height, ensuring that the image appears correctly on different platforms or in marketing emails, while preserving the overall quality of the image as much as possible. You can choose to maintain the aspect ratio or adjust the dimensions without constraints, depending on the use case.
This action is particularly useful when:
- You need to ensure consistency in image sizes across your CRM records, emails, or websites.
- You want to optimize images for different display sizes or platforms.
- You are preparing images for marketing campaigns and need to standardize their size to avoid loading issues or visual discrepancies.


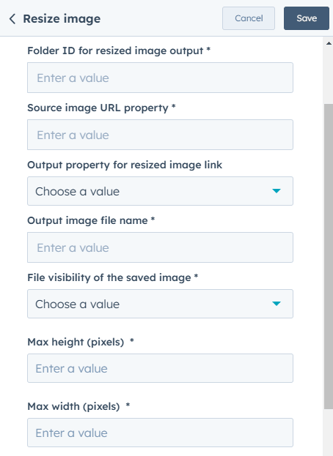
- Folder ID for resized image output The ID of the folder in which the resized image will be stored. This can be a specific folder within HubSpot's File Manager.
- Source image URL property The property containing the URL of the image that needs to be resized. This URL should point to an image file (JPG, PNG, etc.).
- Output property for resized image link The property where the URL of the resized image will be saved. This allows the resized image link to be used in other processes.
- Output image file name The desired name of the resized image file. This name will be used when saving the image to HubSpot's File Manager
- File visibility of the saved image Specifies who can view the image file.
- Max height (pixels) The maximum height (in pixels) for the resized image. The image will not exceed this height while maintaining the aspect ratio
- Max width (pixels) The maximum width (in pixels) for the resized image. Similarly, the image will not exceed this width while maintaining the aspect ratio
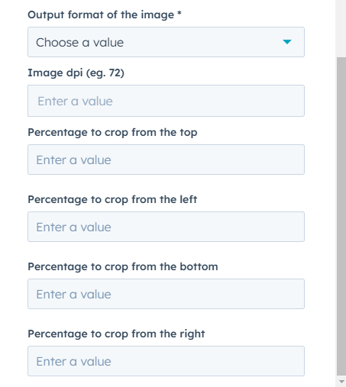
- Output format of the image (png, jpeg) Defines the format of the resized image. You can choose between formats such as PNG or JPEG.
- Image DPI (eg. 72) Sets the image's DPI (dots per inch). For web usage, a value like 72 DPI is common. Higher DPI values are used for print quality images.
- Percentage to crop from the top Defines the percentage of the top portion of the image to be cropped. This percentage determines how much of the image’s top is removed during the resizing.
- Percentage to crop from the left Similar to cropping from the top, this percentage controls how much of the left side of the image will be cropped
- Percentage to crop from the bottom Defines the percentage of the image’s bottom portion to be cropped.
- Percentage to crop from the right Specifies the percentage of the image’s right side to be cropped.
Here’s a concise step-by-step guide for setting up the "Resize Image" action in a HubSpot workflow:
Step 1: Add Action to Workflow
- In your HubSpot workflow, click on the "+" button to add a new action.
- Search for and select the "Resize Image" action from the Workflow Media Manager Actions app.
Step 2: Select Folder ID
- Choose the folder in HubSpot where the resized image will be saved.
Step 3: Set Image URL Property
- Select the HubSpot property that holds the URL of the image you want to resize.
Step 4: Define Output Property
- Select the HubSpot property where the resized image URL will be saved.
Step 5: Enter Output File Name
- Provide a name for the resized image file or use dynamic tokens for automation.
Step 6: Set File Visibility
- Choose whether the resized image should be "Public" or "Private."
Step 7: Define Max Dimensions
- Enter the Max Height and Max Width (in pixels) for the resized image.
Step 8: Select Output Format
- Choose between PNG or JPEG for the resized image format.
Step 9: Set Image DPI
- Enter the desired DPI for the resized image (e.g., 72 DPI for web use).
Step 10: Crop Image (Optional)
- If needed, set the percentage to crop from each side of the image (top, left, bottom, right).
Step 11: Save and Test
- Save the action and test it in your workflow to ensure the image is resized as expected.
