What does the 'Generate a vCard QR Code' action do?
Allows you to create a QR code that encodes a vCard, a digital business card format
The "Generate a vCard QR Code" action within the Integration Glue platform allows you to create a QR code that encodes a vCard, a digital business card format. This action is useful for quickly sharing contact information, including details such as name, phone number, email, and company, in a scannable QR code format.
The action automatically generates a QR code containing the vCard data, which can be scanned by mobile devices or other QR code readers to import the contact information directly into the recipient’s address book.
This action is particularly useful when:
- You want to quickly share your business card digitally with others.
- You are participating in networking events or meetings where exchanging contact details efficiently is important.
- You want to provide a seamless way for users to save contact information without the need for manual entry.


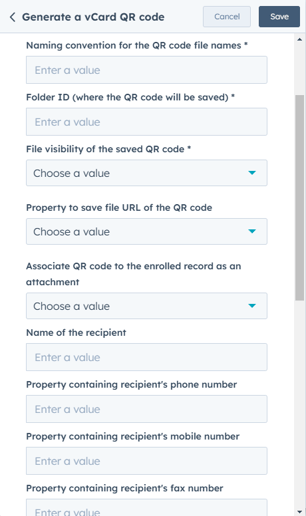
- Naming convention for the QR code file names Defines the pattern or format for naming the saved QR code files. For example, you could name the file based on the contact's name or a unique identifier.
- Folder ID (where the QR code will be saved) Specifies the location (folder) in the file system where the generated QR code will be stored.
- File visibility of the saved QR code Determines who can view the saved QR code file. It could be public, private, or restricted to specific users or groups.
- Property to save file URL of the QR code Indicates the HubSpot property where the URL of the saved QR code file will be stored, making it accessible for future use.
- Associate QR code to the enrolled record as an attachment Allows the QR code to be attached to the enrolled HubSpot record, making it available directly within the record's details.
- Name of the recipient The recipient’s full name that will be encoded into the vCard.
- Property containing recipients phone number The HubSpot property where the recipient’s phone number is stored, to be included in the vCard.
- Property containing recipients mobile number The HubSpot property where the recipient’s mobile phone number is stored, to be included in the vCard.
- Property containing recipients fax number The HubSpot property where the recipient’s fax number is stored, to be included in the vCard.
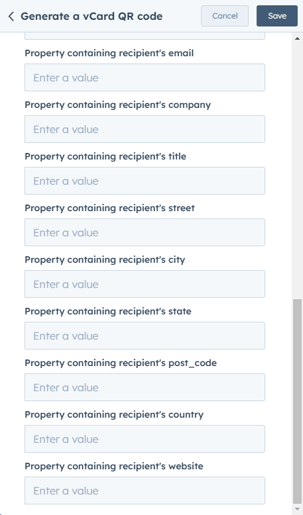
- Property containing recipients email The HubSpot property where the recipient’s email address is stored, to be included in the vCard.
- Property containing recipients company The HubSpot property where the recipient’s company name is stored, to be included in the vCard.
- Property containing recipients title The HubSpot property where the recipient’s job title is stored, to be included in the vCard
- Property containing recipients street The HubSpot property where the recipient’s street address is stored, to be included in the vCard.
- Property containing recipients city The HubSpot property where the recipient’s city is stored, to be included in the vCard
- Property containing recipients state The HubSpot property where the recipient’s state is stored, to be included in the vCard.
- Property containing recipients post_code The HubSpot property where the recipient’s postal code is stored, to be included in the vCard.
- Property containing recipients country The HubSpot property where the recipient’s country is stored, to be included in the vCard.
- Property containing recipients website The HubSpot property where the recipient’s website URL is stored, to be included in the vCard.
Here's a step-by-step guide for setting up the "Generate a vCard QR Code" action:
Step 1: Access the Workflow
- Navigate to your HubSpot account.
- Go to Workflows by clicking on the Automation dropdown menu in the top navigation.
- Create a new workflow or select an existing workflow where you want to add the action.
Step 2: Select Action Type
- Once inside the workflow editor, click on the + icon to add an action.
- In the action selection menu, search for "Generate a vCard QR Code".
Step 3: Configure Naming Convention for the QR Code File Name
- Choose a naming convention for the QR code file. This will define how the QR code will be named when it is saved.
- Example:
_vCard_QR_Code
- Example:
- You can use HubSpot property tokens like
to make the naming dynamic.
Step 4: Select Folder for Saving the QR Code
- Folder ID: Choose the folder where the QR code will be saved. If you have multiple folders in your HubSpot file manager, you can select the appropriate one.
- Example: "vCard QR Codes" folder.
Step 5: Define File Visibility
- File Visibility: Choose who can view the saved QR code file. Options may include:
- Public: Accessible by anyone.
- Private: Only accessible by users with specific permissions.
- Restricted: Accessible by selected users.
Step 6: Select Property to Save File URL
- Property to Save File URL: Choose a HubSpot property where the URL of the saved QR code file will be stored. This allows you to reference the file later within HubSpot records.
- Example:
QR_Code_URL
- Example:
Step 7: Associate QR Code to Enrolled Record
- Associate QR Code to Enrolled Record as an Attachment: Check this box if you want the QR code to be attached to the enrolled record (e.g., Contact, Company, etc.). This will automatically attach the QR code to the record for easy access.
Step 8: Provide Recipient Information
Now, you will need to map the recipient’s contact details to HubSpot properties:
-
Name of the Recipient: Choose the property that contains the recipient’s name.
- Example:
Contact Name
- Example:
-
Recipient’s Phone Number: Choose the HubSpot property where the recipient’s phone number is stored.
- Example:
Phone Number
- Example:
-
Recipient’s Mobile Number: Choose the HubSpot property where the recipient’s mobile number is stored.
- Example:
Mobile Phone
- Example:
-
Recipient’s Fax Number: Choose the HubSpot property for the fax number.
- Example:
Fax Number
- Example:
-
Recipient’s Email: Choose the HubSpot property for the email address.
- Example:
Email Address
- Example:
-
Recipient’s Company: Choose the HubSpot property for the recipient’s company.
- Example:
Company Name
- Example:
-
Recipient’s Job Title: Choose the HubSpot property for the recipient’s job title.
- Example:
Job Title
- Example:
-
Recipient’s Street: Choose the HubSpot property for the recipient’s street address.
- Example:
Street Address
- Example:
-
Recipient’s City: Choose the HubSpot property for the recipient’s city.
- Example:
City
- Example:
-
Recipient’s State: Choose the HubSpot property for the recipient’s state.
- Example:
State
- Example:
-
Recipient’s Postal Code: Choose the HubSpot property for the recipient’s postal code.
- Example:
Postal Code
- Example:
-
Recipient’s Country: Choose the HubSpot property for the recipient’s country.
- Example:
Country
- Example:
-
Recipient’s Website: Choose the HubSpot property for the recipient’s website.
- Example:
Website
- Example:
Step 9: Review and Test the Workflow
- Review all the settings to make sure everything is set up correctly.
- Test the workflow by enrolling a test contact to ensure that the QR code is generated and saved as expected, with all the correct details.
Step 10: Activate the Workflow
- After confirming the setup and testing, activate the workflow.
- The "Generate a vCard QR Code" action will now run each time the workflow is triggered, generating and saving the QR code with the recipient’s information.
