-
HubSpot Micro Apps
- Workflow Association Actions
- Workflow Calculation Actions
- Workflow Clone, Merge & Delete Actions
- Workflow Data Format Actions
- Workflow Data Splitter Actions
- Workflow Enrichment Actions
- Workflow Event Actions
- Workflow Access Actions
- Workflow Generate Code Actions
- Property Option Manager
- Workflow URL Shortener Actions
- HubSpot Mailgun Integration
- Address Manager
- Workflow Media Manager Actions
- Workflow AI (ChatGPT) Actions
- Workflow AI Gemini Actions
- Best Practices
-
DocMergy
-
Docusign HubSpot Integration
-
Macro Apps
-
MyGlue
-
Glossary & Standard Terms
-
Processes and security
-
Internal
-
Use Cases
-
Google Add-on
How to edit a DocMergy generated Document before sending it to Docusign
Instructions on how to edit a DocMergy generated Document before sending it to Docusign via a workflow
- Create a DocMergy action and save the Document in a DocX format
- Download the generated Document on your HubSpot record and make your custom edits
- Upload the edited DocX Document back into HubSpot on your record (the format can be DocX or PDF).
- Tip: Clearly label the edited document before uploading it to HubSpot, so you can identify each version
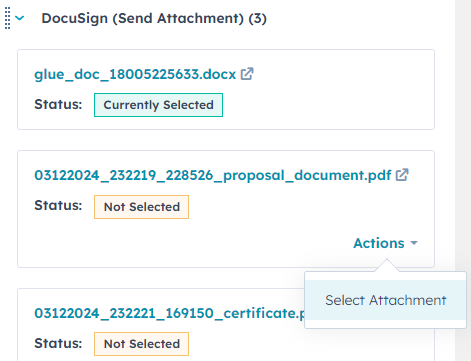
- The 'Docusign (Send Attachment)' custom card on the right-hand side of your record will display the latest three attachments. To send the edited version of your Document, make sure the status is 'Currently Selected'
- If the Document you want to send does not have 'Currently Selected' as its status, update it by clicking 'Actions', then 'Select Attachment'
- Send your Document to Docusign with a Docus0ign workflow action
